Showing posts with label Miss Flo. Show all posts

our kitchen renovation

6.04.2015

Well - our kitchen has been finished for about 3 months and we are super happy with it! Taking this project on made such a huge difference in the entire feel of our house. We should have done it sooner - but it was nice to live in our house to get a real handle on how we best wanted to use the space before taking this project on.


As you can see, I completely changed my mind after posting the initial color scheme/design plan. Going darker on the cabinets was 100% the right choice and I'm so glad we did.

Here are the before/afters. Before - the kitchen was essentially a small galley, with a wall separating the kitchen from the back family room.


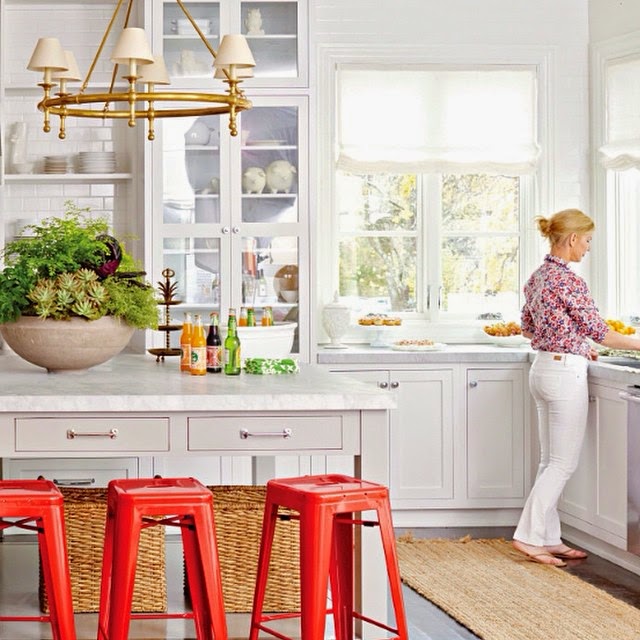
The biggest change came from knocking down that wall and adding a peninsula with glass uppers. This completely opened the space to the family room, which is where we spend most of our time. Having a sight line to the family room will be super helpful with Sam's impending arrival. And I love having a spot for a few bar stools where guests can perch.


Before - range wall.


After - range wall. We kept the range in the same place and added a stainless vent hood in place of the microwave. Microwaves over ranges have become one of my least favorite kitchen things, so I'm glad we relocated the microwave to be hidden in the lower portion of the peninsula.


Another view of the range wall:


Before - sink wall.(Hi Dais!)


After - sink wall. We kept the sink and dishwasher in the same place, but we purchased a panel ready dishwasher and had the cabinet maker make a panel front so the dishwasher blends in. This was maybe my favorite design element!

 
Just some more pretties:


We went with Bianco Toscana granite. I really, really love how the color works with the cabinet color (Urbane Bronze by Sherwin Williams). The veining is really unique, too.


The pendant we chose is the Reed Hanging Light from Circa. The scale and finish are perfect.


In the end, white subway tile won out for back splash.

 all photos by Ely Fair Photography.

We are thrilled with how everything turned out! Living in a construction zone is less than desirable, but all is well that ends well. Now, my sights are set on the master bathroom. We'll see what the Hubs has to say about that :)

nursery planning

2.25.2015

I recently started work on a very exciting and special project - our bebe-to-be's nursery! 2014 ended with the exciting news that we are expecting a sweet little one and we couldn't be happier. While my mind is definitely swimming with practical baby matters, I must admit that a large part of my daydreaming belongs to nursery planning.

We don't find out the nugget's gender until next month, but I already have a solid plan of action for the space whether we have a Samuel....


or an Elise!


See what I did there? I only changed out a few items for a different feel, more suited to a little gal. Very excited to get started!

PS- Kitchen renovation is set to be complete (fingers crossed) this week! And I went a totally different direction than I had planned :)

back splash conundrums

11.14.2014

Yes - there definitely is such a thing as a back splash conundrum. I know this because I am having one. Even though I posted a design plan for our kitchen reno before and was fully confident in that vision.... I am now changing my mind and continuing to weigh my options.

Why? Because designers are their own worst client and they can't leave well enough alone. (just ask my Hubs)

We are still in the planning/bidding process of our kitchen reno, so I have time to weigh lots of different options. And before even one item in our kitchen is touched, I would like to have every item decided on and ordered so there are absolutely no delays. Nothing messes with a renovation timeline like back ordered items.... and budgets - ha!

Anyway. I initially wanted the classic, much loved white subway tile. Which would definitely be a fantastic choice.


However, I have this nagging thought that if I can't do something even a little bit fun and different -- why on earth should a client listen to me when I tell them to do it!?

So I started looking. And I found this.

via.

Painted cement tiles in a fun pattern? Sign me up.

So I was alllllllllllllllll set to do that until I came across this:

via.
It is fantastic and Emily Henderson is a genius. So now, my head is swimming with ideas about how to incorporate a brass trim into my back splash......

Decisions, decisions, as they say. Have a great weekend, everyone!

our new kitchen: the plan

10.07.2014

Since it's been quite a bit since I last blogged, I thought I would come back with a very long and exciting (at least to me!) post.

We knew when we moved into our house last year that a kitchen reno was on 'the list.' And I am happy to say we are getting closer to actually taking this project on. A kitchen is definitely one of the most involved renovation projects, so I have been thinking about what I want to do in this space and planning for this project pretty much since we moved in.

Like with most projects, I like to start with pretty pictures. Here is my direction/inspiration....

 via.
via.
via.
via.
via.

Here is what we are working with. All these pics are pulled from the real estate listing when we purchased the house. While we have made a few minor changes, like changing light fixture, adding a rug, painting the built in hutch, etc, this space is pretty much the same today- cramped and in need of an update.


I do plan to keep a pretty similar layout to what we currently have. Keeping the appliances/plumbing in the same place will be a big cost savings, and it actually is a pretty functional layout. We will also keep most of the appliances, as they are relatively new. I am not someone who purchases something brand spanking new if it isn't totally necessary. And it is definitely not totally necessary in this case!

Right now, our kitchen is basically a walk through, narrow galley. The new kitchen will be much more open to the adjoining spaces, but will definitely be its own room. And, being that our house was built in 1928, I want to keep some of the historic/cottagey feel, so doing an open concept just isn't my jam for this space.

The plan in words:
Demo: We are hoping to widen the opening between the dining room and kitchen. I am slightly old school and do like to have definition between spaces, but this opening could stand to be larger. 

The wall dividing the kitchen and the family room has got to go. After it comes down, we will add a peninsula that will 1 - double our counter top space 2 - have glass front uppers to house our pretty stuff and 3 - be a perch for 2 cute bar stools. This will be the biggest game changer for the room.

Cabinets: I have pretty much decided to go with Ikea cabinets. After doing a lot of research on the issue, it seems to be the best choice all in. With this kitchen, I am just not going to have the budget for custom cabinets, but I am so excited to see how I can make Ikea cabinets feel custom for my space. If you are interested - or skeptical :) - about Ikea cabinets, I encourage you to read the following. 1. 2. 3. 4. 

I am going to go with the Adel style in white. It is a classic shaker style, and definitely my favorite option looks-wise. There are some gorgeous Adel kitchens out there- lots of inspiration to pull from!

I really love the color of the cabinets that we currently have (Benjamin Moore Carrington Beige). It is unique and feels appropriate for the time the house was built in. But I am faltering on if I want to paint the new cabinets or just leave them white. I'm guessing they will remain white... but we will see.

Vent hood: Having a microwave above the range is pretty much my least favorite thing aesthetically speaking. I am planning to do something more like this. Will relocate the microwave to the peninsula.

Floors: patch, sand, refinish to match the rest of the house.

Sink: Farmhouse.

Counters: Leaning toward river white granite. Granite is a durable, re-sale friendly option. I will look for a slab with lots of white in it. Examples: 1. 2.

Back splash: Going with the perennial favorite: white subway, traditional install. Classic, pretty, easy to clean.

Lighting: I want to do something fun over the peninsula and am leaning toward the Visual Comfort Goodman Pendant or a big globe.

Cabinet hardware: I'm all over the board on this. Brass? Polished nickel? Glass? Probably brass.Think it will help warm up all the white that will be going on.

Stools: The red bar stools in this kitchen speak to me. They will be the 'fun' that I like every space to have.

And because a visual is always helpful:


Let me just say - I am VERY excited about this project!

my fav chairs - the after

4.23.2014

Well- my best vintage find yet got a face lift and they are looking fiiiiiiiiiiiiiiiiine.


Like I mentioned before, they really weren't in terrible shape and could have stayed in their original condition. But I knew that they could be outstanding with a little re-do, and I proved myself right!

This time I outsourced the work and had a local shop do the painting and re-upholstering. Sometimes it's just better to pay the professionals to do what they do.


 I am quite pleased :)

guest bedroom vanity

1.09.2014

After living with our guest bedroom for a couple months, I realized that rearranging the room would be a much better use of the space. So before the holidays, I started making some tweaks. There is now a space in the room that is perfect for a little vanity area. And seeing Cece Thompson's home in Matchbook Mag this month gave me the kick in the rear I needed to get going on pulling my own vanity together.

Hers is very similar to what I had envisioned for our guest room.


But here is my take on it:


I know it will be a space I utilize a lot once it is done, so I'm excited to get going! Will definitely share the entire room once it is a bit more pulled together. Hope you guys are having an awesome week :)

pondering: dining room art

12.17.2013

A constant item on 'the list' since we moved in has been art for the dining room. I've pondered lots of options, but the Hubs and I recently settled on the winner.

The wall is big, so the art gets to be big too! But before pulling the trigger, I wanted to make sure the dimensions are right. So I did what any self-respecting decorator does - I taped it out. Might not look like the classiest thing in the world, but it totally helps get a sense for the scale.


Just to give you an idea, we are going for this vibe (over sized scenic):


Think it's going to be goooooooooooooooooooooood. Now I really can't wait for the 'after'!

Probably not going to post until after the New Year as we will be very busy with travel and whatnot, so I hope you all have a very Merry Christmas!! And thank you SO much for following along this year. It's been a great year and I can't wait to see what the next will bring :)

newest vintage find

11.21.2013

I shared in this Insta snapshot on Friday that I scooped up some vintage Drexel Heritage chairs at a local antique store, and they now live happily in our formal living room.

@emilyswensondavis

The plan is to have them reupholstered eventually. Probably in a good neutral and have the frames sprayed black. Honestly, I would love to have them upholstered in the animal print that is on the ottomans that used to sit there, but I'm pretty sure it's been discontinued.


I liked the leopard ottomans that I had in that spot before. But after a while, I realized they weren't the most comfortable option for that space. And really, since this post, I've been searching for the right chairs to switch them out for.

Before:


Now: (nevermind that the lighting is much better in the before pic...)


I knew when I saw them that I liked them a lot. But I did take some time to think about pulling the trigger on them (even though they were very afforable) for a few days. I really could have missed out on them because after having them home, I realize just how cool and well made they are. When I find something that I don't know much about, I always do some Google searching to learn more about my find. Especially in this case because I hadn't seen this shape of chair very much before. This posting and this site call them Dorothy Draper style. This posting  and this posting call the style "Esperanto" chairs.

If any of you know any more background, I would love to hear it!


Another design side-note: most of the time, I try to keep a pretty good mix of old/new items in each space I decorate. In this room, the 'new' items are the banquettes, garden stools, pillows, cowhide rug and mirror. The 'old' items are the armoire (in pic below), white chests, coffee table and now the chairs.


So I'm feeling really good about the 'mix' in this room. More to come!

our fiddle leaf fig: the 6 month mark

11.12.2013

It's been about 6 months since our pretty fiddle leaf fig came to live with us and I am happy to report it is doing very well! I did ALOT of research on this plant, and others, before purchasing. Since I've never really had a green thumb I didn't want to make the investment in a big houseplant if it was just going to die (because it was definitely not what I would call cheap!). SO- I thought I would share what I've done thus far to keep this pretty alive.


Initially, I used this post and this post as a guide. I also talked pretty extensively with the gardeners at Southwood (where I purchased from) about their care tips. They told me pretty much the same things as the websites I looked at. Something that freaked me out before buying was this plant was listed as 'toxic' to pets. But after talking to the professionals, I felt it would be ok at our house. Daisy doesn't have a chewing problem and doesn't just stand there and lick the thing, so she's never been bothered.

ok- my tips.
1- Don't over water. I think I took this way too literally initially and almost killed the thing because I didn't water it for about a month when I got it. But thankfully, it rebounded well. I now water it every Friday morning, 6 cups of water. I do make sure the soil is pretty dry before I water and have skipped weeks here and there.

2- Get plenty of sunlight. Mine gets a lot of indirect sunlight throughout the day- it lives by a west-facing window.

3- I dust the leaves about once a month. Just like anything else, leaves can collect dust and that will not allow it to soak in the sunlight it needs. So ya, dust the leaves. I just use damp paper towels.

4- I've read differing reviews about rotating the plant so different sides get the most sun. I've rotated it here and there and it seems to do well with it.

5- I've only 'pruned' one branch. After extensive internet searching, I found that 'pruning' basically means 'cutting'. Who knew!? So ya- I did that to one of the limbs when it shot WAY out and started to droop down. It's done great after I pruned it. Stayed the length I wanted and has continued to grow leaves.

That's it! Yay for me not killing it!

Miss Flo progress : family room pt. 2

10.23.2013


A few months back, I shared some of the progress we've made on our family room. But I pretty much only showed one side of this room because the other side was ROUGH. But, with the addition of some pretty ghost chairs, a new tv console, the mad cord hiding skills of my Hub and roughly 6 months after moving in - this room is looking great! {if I do say so myself}


Other side:


I chose the ghost chairs because they are super light and easily moved around. I was slightly hesitant about bringing them to the Hubs for approval because they can be seen as girly. BUT he really likes them too, mostly because I think he recognizes that they bring form and function - score!


The TV console is Ikea .... in case you hadn't recognized it from the 125 other homes you've seen it in ;) But - at the risk of being ostracized by the design community - I really love this piece! It has beautiful, clean lines. It's a gorgeous, rich color. It can be personalized to your tastes (switching the pulls/O'verlays/paint). And it's inexpensive. What's not to love? You can see the way I personalized ours was simply switching out the pulls for some more decorative brass rings. Super simple and cheap tweak that changes the whole look.


If you saw this pic on Insta, then you know finding the right boxwood balls was kind of an issue. But these are perfect and totally worth the wait.


This room epitomizes what I say about decorating - fill a room with things you love and it will just work. I really do love every piece in this room. And stylistically they might not all 'go' together - but I honestly prefer it that way.

Next up for this room is figuring out a way to disguise the alarm pad. And a custom dog bed for my sweet nugget... she obviously deserves it :)


 Hope you all are having a great week!

DIY : stacked log fireplace screen

8.07.2013


Since we moved into Miss Flo, I've been wanting to create something like this for our non-functioning fireplace. And unfortunately, this feeble attempt has been hanging out for the past few months. Until last week when this pin renewed my enthusiasm. And now, we have this!


Here is how we (myself and my handy Hubby) created our stacked log fireplace screen. Not sure if you non-Tulsans are aware, but we had a crazy storm a few weeks back. This storm downed alot of trees, limbs, etc. So, we went on a limb-hunting trip. I was looking for lighter colored, round wood. These sycamore limbs fit the bill:


Then, my resident handy man cut them down into about 3-4 inch long pieces (thanks for lending us your saw, Emily & David!)


As he was cutting, I was arranging the pieces onto a piece of cardboard that I had drawn the dimensions of our fireplace out on.


This was helpful because I knew which size pieces I needed more of along the way. After getting all of the pieces arranged, we went to Lowes and got a piece of plywood cut into the dimensions we needed.  I painted the plywood black and after it dried, I transferred the pieces from the cardboard to the plywood.


Then, I glued them down one by one.


We let them dry overnight. Because I wanted to make sure they were super duper secure, we started securing them with nails from the back of the plywood.


But the hammering made a bunch of the pieces fall off, so we quickly abandoned that practice. I figure if any piece falls off, I'll just glue it back on. C also rigged up this way for it to stand in the fireplace:


But as we were putting it in the fireplace, we found it could just wedge in there pretty well and be fine without the stand. A happy accident, really.

We are SUPER happy with this project! Really inexpensive, and really chic looking.


This room is coming together really well!


Next up for this space - art and custom pillows!
 
Blog Design by Sweet Simplicity